Yoga for Hip Pain: 6 Gentle Stretches for Beginners

Yoga for Hip Pain: 6 Gentle Stretches for Beginners
Introduction
Hip pain is a common problem for people of all ages. It can be caused by sitting for long periods of time or engaging in activities that put stress on the hip joints. This pain can make it difficult to do everyday tasks and lower your overall quality of life.
But there's good news: yoga can be a gentle yet effective way to relieve hip pain. By practicing specific poses, you can not only increase your flexibility but also strengthen the muscles around your hips, leading to better long-term health.
In this guide, we'll focus on beginner-friendly yoga stretches that are perfect for anyone looking to ease hip tension and improve mobility. Whether you're new to yoga or have been practicing for a while, these poses are designed to help you find relief and support your hip health.
So let's get started! Here are 6 yoga poses that are great for beginners and specifically target hip pain. To learn more, you can get in touch with us as well.
Understanding Hip Pain and Its Causes
When we talk about hip pain, we're referring to the discomfort felt in and around the hip joint. This pain can originate from several areas, such as the muscles, ligaments, or nerves that surround the hip joint. It's essential to understand that the causes of hip pain are multifaceted, often stemming from issues like tight hips, imbalances in the body, or referred pain from the lower back or sciatic nerve.
1. Tight Hips
Tight hips are a common cause of hip pain. When the muscles around our hips become stiff from prolonged sitting or lack of movement, they can create pressure on the hip joint leading to discomfort. This tightness can also result from stress or anxiety as our bodies tend to hold tension in certain areas, including our hips.
2. Imbalances in the Body
Similarly, imbalances in the body, such as strength disparities between different muscle groups or poor posture, can contribute to hip pain. For instance, weak core muscles can place additional strain on the hip joints as they compensate for this lack of support.
3. Referred Pain
Another source of hip pain is referred pain. Referred pain occurs when a problem in one part of the body creates discomfort in another area. A common example of this is sciatica - a condition where irritation or compression of the sciatic nerve causes pain along its path, which includes the hips.
Living with chronic hip pain can significantly affect your daily life and overall well-being. Simple tasks like walking or bending over can become challenging. Long-term hip discomfort might also lead to sleep disturbances due to the inability to find a comfortable sleeping position.
Perhaps surprisingly, tight hips have a domino effect on other areas of our bodies. Tightness in this area can limit our range of motion and contribute to conditions like lower back pain or sciatica. For instance, when our hips are tight and lack flexibility, we often compensate by placing additional strain on our lower back, which can lead to discomfort and injury over time.
When it comes to managing hip pain, Advanced Wellness offers a holistic approach. With a focus on preventive care and overall wellness, we'll be delving into how yoga can alleviate hip pain in upcoming sections.
The Benefits of Yoga for Hip Pain Relief
Hip pain is a common issue that many people face. The good news is that yoga can be a great way to manage and alleviate hip pain. Yoga combines stretching and strengthening exercises, which can help relieve tension and improve stability in the hips.
Stretching for Hip Muscles
One of the main benefits of yoga for hip pain relief is its ability to stretch tight muscles in the hips. During yoga practice, you will perform various poses that specifically target the hip muscles, including the hip flexors, glutes, and piriformis. These stretches help lengthen and relax these muscles, reducing the pressure they exert on the hip joint. As a result, this can lead to decreased discomfort or pain in the hips.
Building Core Strength
In addition to stretching, yoga also focuses on building core strength. Having a strong core is important for maintaining good posture and balance, which are key factors in hip health. Certain yoga poses require you to engage your abdominal muscles, which helps strengthen them over time. This increased core strength supports your spine and helps maintain proper alignment of the hips, thereby preventing or reducing hip pain.
Cultivating Body Awareness
Yoga is not just about physical exercise; it also emphasizes body awareness. Through mindful movements and breathing techniques, yoga teaches individuals to pay attention to their body's signals. This heightened sense of self-awareness can help them identify areas of tension or discomfort in their bodies, such as their hips. Understanding your own body is the first step towards effectively addressing issues like hip pain.
Additional Benefits of Yoga
In addition to its direct impact on hip pain relief and flexibility, regular yoga practice offers other advantages:
Stress Reduction: Chronic stress often manifests physically as muscle tension or tightness – factors that can worsen hip pain. Yoga's focus on deep breathing and mindfulness techniques makes it an effective tool for managing stress levels.
Overall Well-being: Yoga is known to have a positive impact on mental and emotional well-being. It promotes relaxation, improves sleep quality, and boosts mood – all of which contribute to better overall health.
Consistency is Key
It's important to note that the benefits of yoga for hip pain relief are cumulative and require consistent practice. The more you incorporate yoga into your routine, the greater the potential for improvement in your hip health. So remember, stick with it and be patient – your efforts will pay off in the long run.
Now that we've explored the benefits of yoga for hip pain relief, let's move on to the next section where we'll discuss how to prepare for a safe yoga practice. These foundational steps will help you get started on your journey towards alleviating hip pain.
Preparing for a Safe Yoga Practice
Like any exercise, yoga requires proper preparation. It's crucial to warm up your body before delving into deeper hip stretches. A simple beginner yoga sequence can help ready your muscles and joints for the upcoming poses.
Warm-Up Sequence:
Start with a comfortable seated position, drawing deep breaths in and out.
Gently move into the cat-cow pose, alternating between arching and rounding your back.
Lie on your back and bring one knee to your chest, leaving the other leg extended (supine knee-to-chest). Repeat on both sides.
These movements serve as an easy introduction, gradually increasing flexibility and blood flow in preparation for more intense poses.
When choosing a seated position for the upcoming hip-opening yoga poses, ensure stability and comfort. You can sit cross-legged or extend your legs out in front of you. Alternatively, you may choose to kneel if it feels more comfortable. Listen to your body and adjust as necessary.
Incorporating yoga props can enhance your practice, offering additional support and enabling deeper stretches. Here are few options:
Yoga Bolsters: Ideal for providing support in seated forward folds.
Yoga Blocks: Assist in maintaining balance during challenging poses.
Yoga Straps: Help reach limbs that are otherwise too far away, improving flexibility.
Remember that these props are optional and not needed by everyone. Their usage depends entirely on individual comfort levels and physical conditions.
By spending time preparing adequately for your yoga practice, you increase the effectiveness of each pose and reduce the risk of injury.
Yoga Stretches for Hips
Standing Yoga Poses

Standing Yoga Poses
Engaging in standing yoga poses for hip pain is a multifaceted approach to enhancing hip flexibility while simultaneously fortifying the muscles that support the hips. These dynamic movements encourage proper alignment, which is pivotal in preventing undue strain on the hip joints and surrounding muscles. Here are key reasons why integrating standing poses into your practice can be beneficial:
Strength and Stability: Grounded stances, such as Warrior II, harness the body's weight to build muscular fortitude, particularly in the lower body. This increased muscle strength contributes to greater stability in the hips.
Enhanced Flexibility: Through gradual stretching, standing poses gently coax the hip muscles into releasing stored tension, leading to improved range of motion.
Circulation Boost: Active postures stimulate blood flow to the hips, aiding in recovery and reducing stiffness.
Mind-Body Coordination: As you focus on maintaining balance, these poses foster a deeper connection between mind and body, enhancing proprioception and spatial awareness.
Incorporating standing yoga poses for hip pain into your routine offers a balanced blend of resistance and relaxation, ensuring that your hips receive comprehensive care. It's essential to maintain proper alignment throughout each posture to maximize benefits and minimize risk of injury. By aligning your joints correctly, you encourage an even distribution of force across the hips, safeguarding against imbalances that could exacerbate discomfort.
Transitioning smoothly from one pose to the next will keep your practice fluid and focused on relieving hip tension. As you move through these standing postures, pay attention to the sensations in your hips—embracing each stretch with mindfulness and patience.
1. Warrior II Pose

Warrior 2 Pose
Hip pain can be a common issue for those spending long hours seated or those with lifestyle habits that tighten hip muscles. Warrior II Pose, also known as Virabhadrasana II, is one of the standing yoga poses for hip pain that targets the hip flexors, glutes and inner thighs to increase flexibility and strength.
Step-by-Step Instructions:
Start by standing tall at the top of your yoga mat, feet hip-width apart. Maintain a straight spine and distribute your weight evenly between both feet.
Take a big step back with your right foot, about the length of one of your legs. Turn your right foot out to about 90 degrees so that it's parallel with the short edge of your mat.
Keep your left foot pointed forward. Align your front heel with the arch of your back foot.
Extend your arms out to the sides at shoulder height, palms facing down. Look over your left hand and draw your shoulders down away from your ears.
Bend your front knee until it aligns directly over the ankle of the same leg. Ensure that you can see your front big toe past the inside edge of your knee when you look down.
Hold this pose for five deep breaths, then switch sides.
This pose not only opens up the hips but also strengthens the hip flexors and glutes, providing relief from hip pain. Proper alignment is key in Warrior II pose to ensure maximum benefit and prevent potential strain.
By incorporating Warrior II into regular practice, individuals can gradually improve their hip flexibility and reduce discomfort. The pose also offers additional benefits such as enhanced body awareness and improved balance - crucial elements for overall well-being.
Moving from standing poses to reclined stretches allows different categories of yoga exercises for hips to be explored, providing a comprehensive approach to addressing hip pain. Next up in this sequence is Triangle pose, another effective standing pose for hip pain relief.
2. Triangle Pose
The practice of yoga offers a diverse range of poses, each targeting specific areas of the body. For hip pain relief, standing yoga poses can offer substantial benefits. Triangle Pose, also known as Trikonasana, is a classic standing pose that focuses on stretching the hips and groin area while improving spinal health.

Woman doing yoga in triangle pose
How to Perform Triangle Pose
Follow these step-by-step instructions to perform the Triangle Pose:
Start with Mountain Pose (Tadasana): Stand upright with your feet together and arms by your sides. This grounding pose sets the foundation for proper alignment in Triangle Pose.
Step or Jump Your Feet Apart: Extend your arms to the sides and step or lightly jump your feet apart, about leg-length distance.
Turn Your Right Foot Out: Rotate your right foot 90 degrees so it's pointing outwards and turn your left foot slightly inwards.
Extend Your Torso Over Your Right Leg: Reach your right arm towards your right foot as you extend your torso over your right leg, hinging from the hip.
Lower Your Right Hand: Bring your right hand down to rest on your shin, ankle, or if possible, on a block placed outside of your right foot.
Reach Your Left Arm Up: Extend your left arm towards the sky, maintaining alignment with the top shoulder directly above the bottom one.
Look Up Towards Your Extended Arm: If it feels comfortable for your neck, gaze upward towards your left hand.
Hold and Repeat: Hold this pose for several breaths before rising back up to standing and repeating on the other side.
Performing Triangle Pose regularly can help stretch and open up tight hips while improving balance and stability—crucial aspects of relieving hip pain. The unique twist this pose provides also facilitates good spine health by promoting alignment and flexibility. Contact us today for private yoga classes.
Extended Side Angle Pose
Extended Side Angle Pose, known as Utthita Parsvakonasana in Sanskrit, offers a multi-faceted approach to alleviating hip discomfort. This standing yoga pose for hip pain not only targets the hips but also engages the core and lengthens the spine, promoting a holistic sense of well-being.
Benefits:
Releases tension in the piriformis muscle
Creates space in the lower back
Enhances stability and balance
Stretches the side body and hip area
Step-by-Step Instructions:
Begin in Warrior II pose with your right foot forward.
Ensure proper alignment; your right knee should be directly over your right ankle.
Lean your torso forward, extending it over your right leg.
Lower your right forearm to rest on your right thigh or place your right hand outside your right foot on the floor or a block.
Sweep your left arm overhead, reaching forward with the fingertips, palm facing down.
Rotate your chest toward the ceiling, keeping both sides of the waist long.
Hold this position, taking deep breaths to deepen the stretch with each exhale.
To exit, inhale as you press through your feet and rise back up to Warrior II.
Repeat on the opposite side for balanced development.
Ensure that you maintain steady breathing throughout to facilitate deeper relaxation of tight muscles.
Transitioning smoothly into reclined yoga stretches for hip pain allows for further opening and relaxation of the hips without additional strain on the back or standing muscles.
Reclined Poses
Reclined poses serve as a gentle way to address hip pain, providing an opportunity for deep relaxation and targeted stretching without placing undue stress on other parts of the body. These poses encourage a state of restfulness while actively promoting flexibility and relief in areas that contribute to hip discomfort.
Reclined Poses
Reclined yoga stretches for hip pain offer a unique combination of comfort and effectiveness. By lying on the back, these poses encourage the hips to open gently, allowing for a natural gravitational pull to aid in the release of tension. This position is particularly therapeutic as it minimizes pressure on the spine and can be a safer option for those with an injured muscle or disc problem. In proper alignment, reclined poses promote relaxation of the body and mind while specifically targeting hip discomfort.

Woman Practicing Yoga Backbend
Supine Pigeon Pose: Lying on your back, cross one ankle over the opposite knee to create a figure-four shape. Gently pull the uncrossed leg towards you while keeping your head and shoulders relaxed on the mat. This pose stretches the outer hips and glutes.
Reclined Butterfly Pose: With soles of your feet together and knees dropped outward, lie flat to open up the groin and inner thighs.
Legs Up The Wall Pose: Position your legs vertically against a wall while lying flat on your back to alleviate tension in hips and lower back.
Each stretch should be approached with patience, allowing the body to ease into deeper relaxation and hip opening as it becomes comfortable.
4. Supine Pigeon Pose
The Supine Pigeon Pose offers a gentle approach to alleviating hip discomfort, making it an excellent choice for those seeking hip pain relief, especially if there are underlying nerve issues. When compared to standing yoga poses for hip pain, reclined yoga stretches like the Supine Pigeon Pose allow for focused attention on the hips without the need for balancing or additional strength.
How to Perform Supine Pigeon Pose:
Start Position: Lie flat on your back with knees bent and feet planted firmly on the mat, hip-width apart.
Ankle Placement: Pick up your right foot and place your right ankle across your left thigh, just above the knee. Your right knee should be pointing outwards, creating a figure-four shape.
Engagement: Activate your right foot by flexing it; this encourages proper alignment and protects your knee.
Deepening the Stretch: Gently draw your left thigh towards you, reaching through the gap of your figure-four to interlace fingers behind the left thigh or on top of the shin (avoiding placing pressure directly on the knee).
Hold and Breathe: Maintain this position while taking slow, deep breaths. Allow the gravity to gently deepen the stretch in your right hip as you relax further with each exhale.
Duration: Hold for 30 seconds to 2 minutes, depending on your comfort level.
Release: Carefully undo the clasp of your hands and return both feet to the floor.
Repeat: Perform the same sequence with your left ankle over your right thigh to ensure balance in hip stretching.
By practicing proper alignment in this pose, you help prevent additional strain on other parts of your body while targeting hip tightness effectively.
5. Bridge Pose
Experiencing hip discomfort? The Bridge pose, a key component of both standing yoga poses for hip pain and reclined yoga stretches for hip pain, might be the perfect solution. This asana promotes both hip mobility and stability while gently opening up the front of the hips.
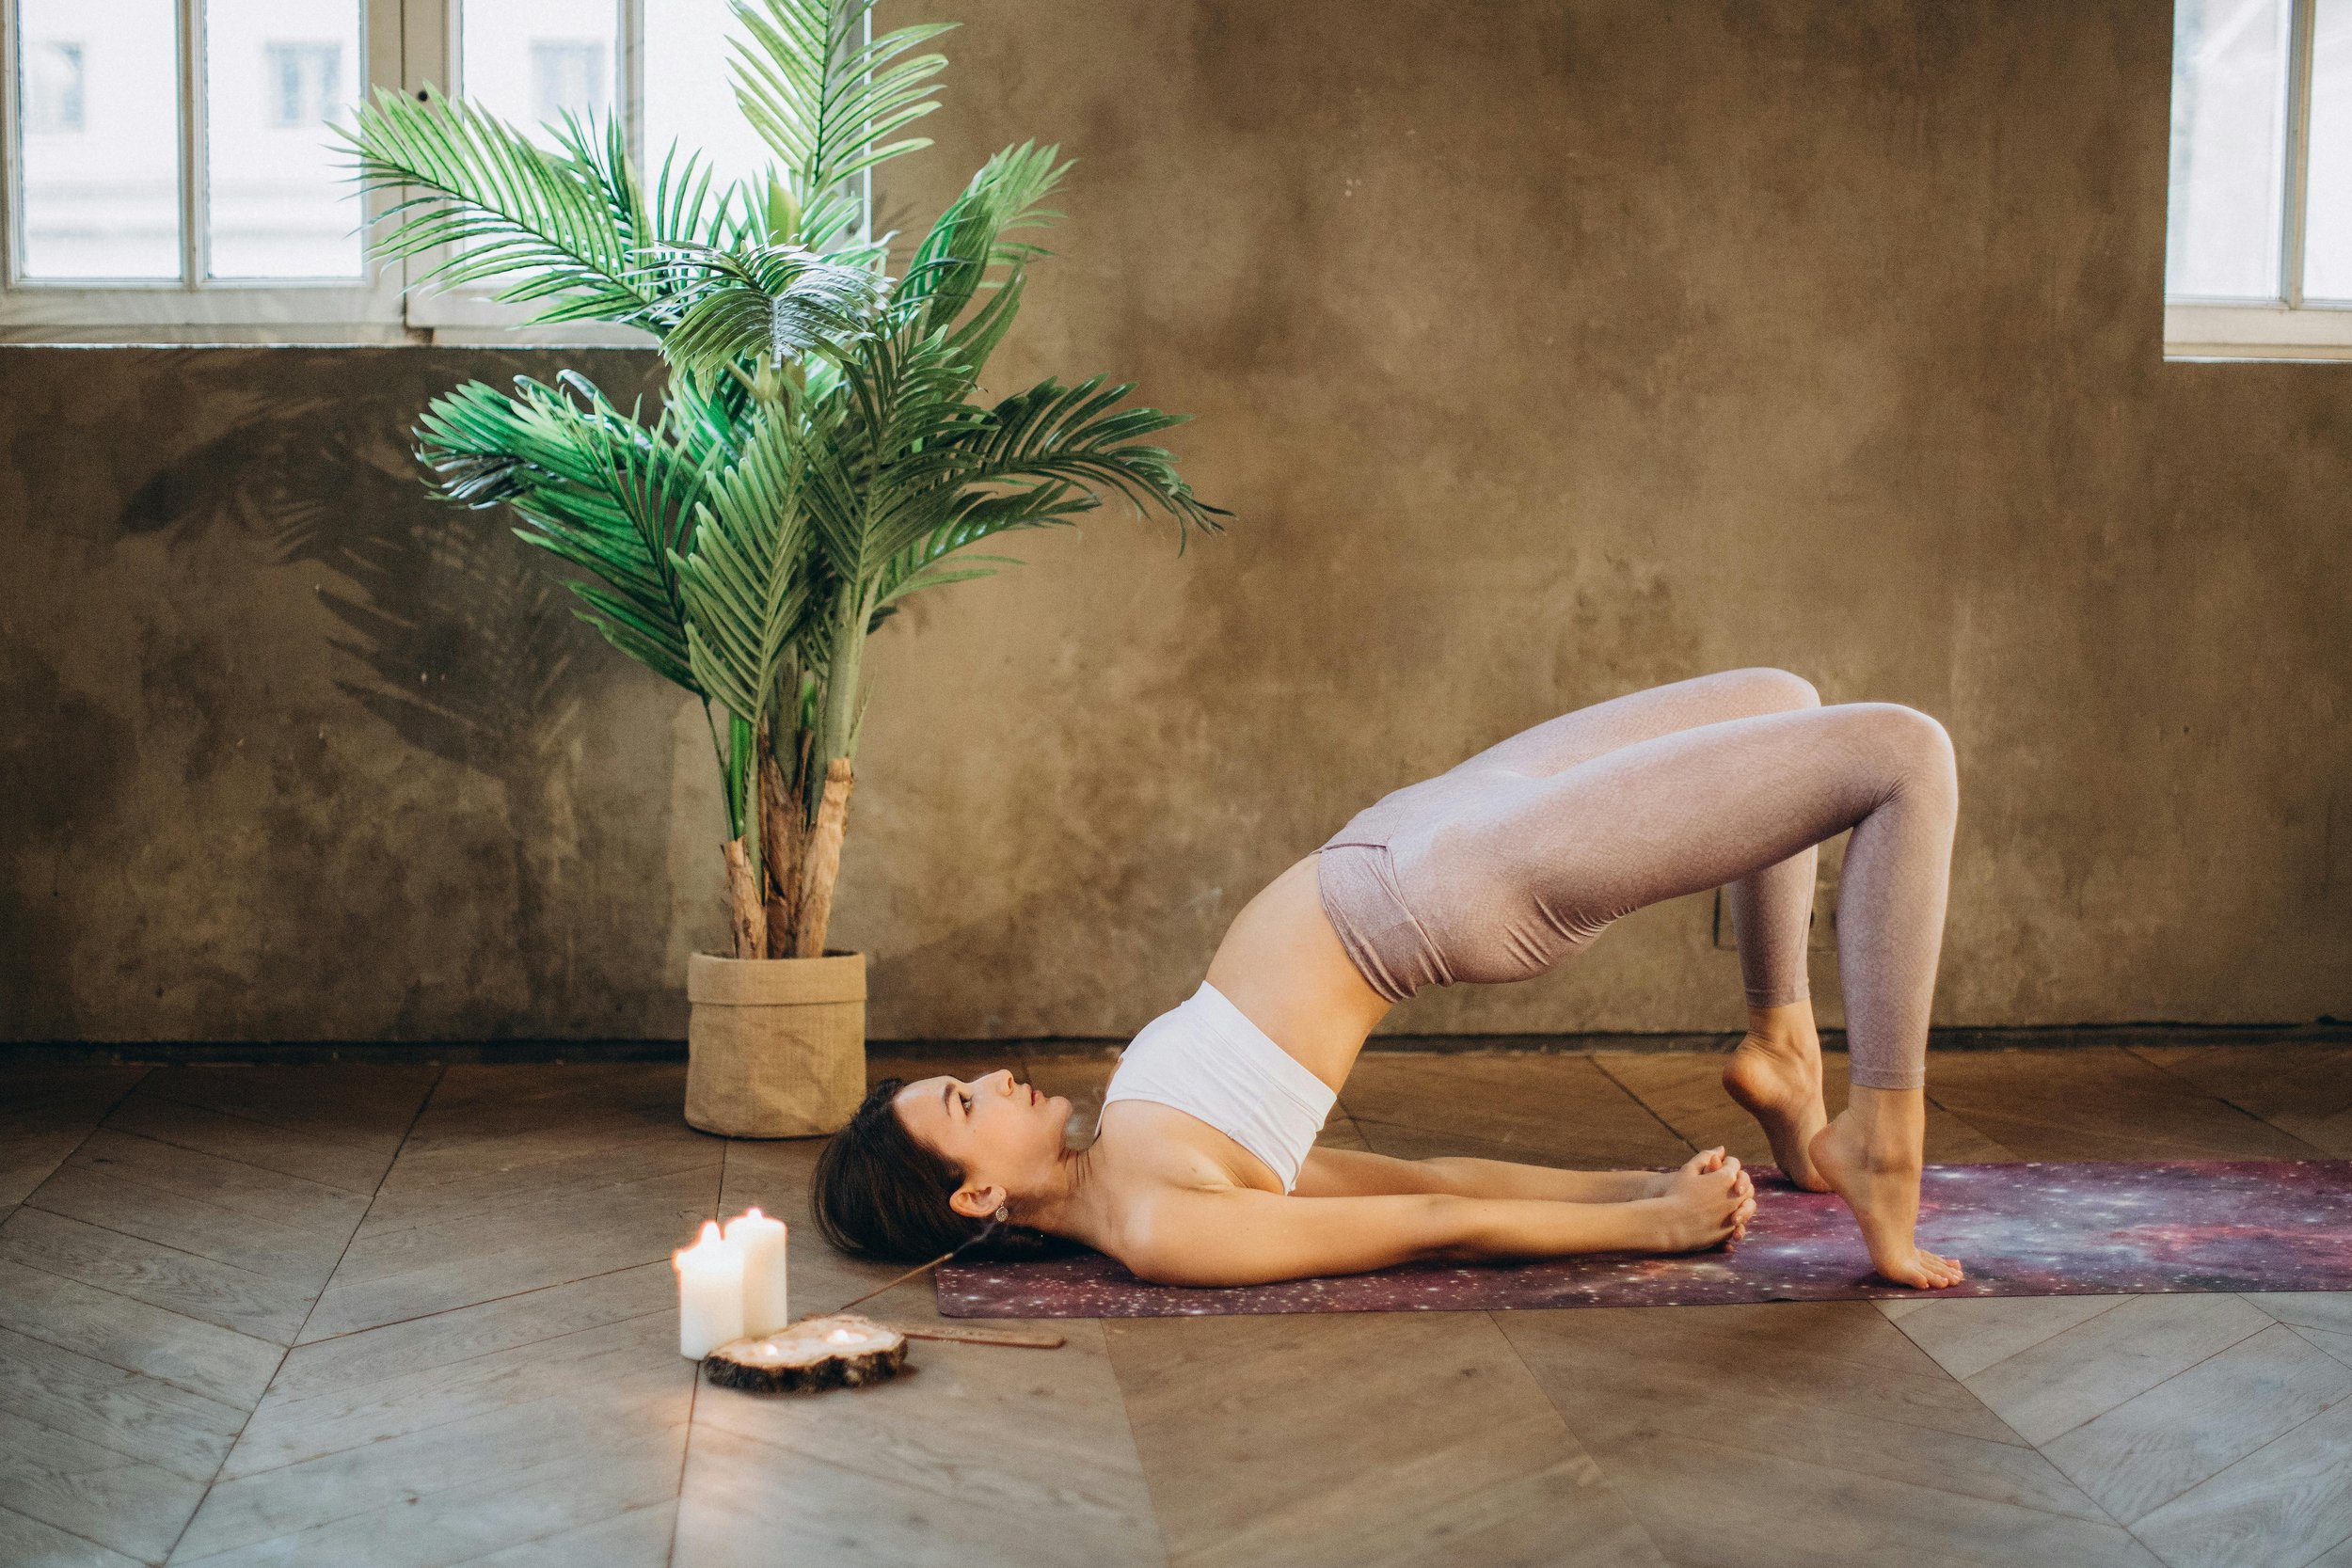
Woman Practicing Yoga Bridge Pose
How to Perform Bridge Pose
Starting position: Lie flat on the back with arms resting alongside the body. Bend your knees and place your feet flat on the floor, about hip-width apart. Ensure heels are close enough that fingertips can barely touch them.
Raise your hips: Pressing into your feet, lift your hips off the floor. Try to balance weight equally between both sides of your body to maintain proper alignment.
Intensify the stretch: If comfortable, clasp hands underneath your body and press down into the mat to lift your hips even higher.
Hold and release: Maintain this bridge position for several breaths, feeling the front of your hips opening and stretching out. To release, slowly lower your hips back down to the mat.
The Bridge pose is more than just a hip opener; its benefits extend to strengthening the lower back and glutes, which plays a crucial role in supporting hip function. Remember, maintaining proper alignment during this pose is key – it ensures that the stretch targets where it's needed without causing strain elsewhere in your body.
Whether you're exploring standing yoga poses for hip pain or reclined yoga stretches for hip pain, remember to pay attention to how each pose feels in your body. Yoga should never cause sharp or intense pain – if it does, ease out of the pose and consider modifying it or trying a different pose instead.
6. Happy Baby Pose
Happy Baby Pose is a delightful stretch that brings attention to the inner groins and offers hip pain relief by releasing tension in the lower back. Proper alignment is key to reaping the full benefits of this reclined yoga stretch for hip pain.
How to Perform Happy Baby Pose:
Begin by lying flat on your back on a comfortable yoga mat.
With an exhalation, bend your knees into your chest.
Open your knees slightly wider than your torso and bring them up towards your armpits.
Position each ankle directly over its corresponding knee so that the shins are perpendicular to the floor.
Flex your feet, reaching up to grasp the outer edges of your feet with your hands. If you cannot reach your feet, loop a strap or towel over each foot to extend your reach.
Gently pull down on your feet, guiding them closer to the floor while maintaining a 90-degree angle at the knees.
Keep your tailbone down on the mat and try to flatten the sacrum against the floor to prevent excessive arching in the lower back.
Hold this position for 30 seconds to a minute, focusing on deep breathing and allowing gravity to aid in stretching the hips.
To release, let go of the feet and draw your knees together. Gently rock from side to side before extending your legs along the mat.
This pose not only aids in stretching tight hip muscles but also promotes a sense of playfulness and ease, which can be therapeutic for both body and mind.
Transitioning smoothly into different categories of yoga stretches enhances overall understanding and practice efficiency:
Standing Poses
Reclined Poses
The journey through standing and reclined poses provides a comprehensive approach to managing hip discomfort, allowing beginners and experienced yogis alike to explore their range of motion safely and effectively.
Enhancing Your Practice with Props
Discover the synergistic benefits of incorporating equipment for yoga practice such as a massage gun and foam roller into your routine. These tools are designed to enhance the effectiveness of yoga stretches, especially when targeting hip pain and stiffness.
Massage Gun Use in Yoga
A massage gun can be a transformative tool when used before or after your yoga practice. By delivering concentrated vibrations to your muscles, it helps to:
Relax tight muscles: Before starting your yoga session, use the massage gun on hip flexors or glutes to reduce tension.
Improve blood circulation: Enhanced blood flow aids in muscle recovery and flexibility.
Decrease soreness: After a yoga routine, apply the massage gun to gently soothe any areas of discomfort.
For example, after completing the Warrior II Pose, which engages and opens the hips, using a massage gun on the surrounding muscles can help alleviate any residual tightness.
Foam Roller Integration
Similarly, a foam roller offers an excellent complement to yoga poses by aiding in myofascial release. Here's how you can use it:
IT Band Release: Post Warrior II Pose, lie on your side and place the foam roller beneath your thigh. Slowly roll up and down from just below your hip to above your knee to target the IT band.
Glute Activation: Before beginning Extended Side Angle Pose, sit on the foam roller and gently roll back and forth to stimulate blood flow in the buttocks area.
Remember that while these props provide substantial benefits, they should be used as an adjunct to your practice rather than replacements for proper technique and alignment. Listen attentively to your body's feedback when using these tools; they are most effective when incorporated sensitively into your practice.
By integrating props like a massage gun or foam roller into your yoga stretches, you create a comprehensive approach that not only targets hip flexibility but also attends to muscular health and recovery. Embrace these tools with care, allowing them to elevate your journey towards greater mobility and less discomfort in the hips.
Conclusion
Hip pain is a common issue that can make it difficult to go about your daily activities. Yoga offers a natural and effective solution for relieving this discomfort. In this article, we discussed nine beginner-friendly yoga poses that specifically target hip pain, providing relief and increasing flexibility.
Incorporate the following poses into your routine to build strength, stability, and flexibility in your hips:
Warrior II Pose: This pose helps to strengthen the legs and open up the hips.
Triangle Pose: This pose stretches the hamstrings, hips, and groin muscles.
Extended Side Angle Pose: This pose helps to stretch and strengthen the legs, hips, and core.
To promote relaxation and release tension in the hips, try incorporating these reclined poses:
Supine Pigeon Pose: This pose targets the outer hip muscles and can help relieve tightness in the hips.
Reclining Bound Angle Pose: This pose opens up the hips and inner thighs while promoting relaxation.
It's important to always warm up your body before attempting these stretches to prevent injury. Listen to your body's needs and modify these poses as necessary to stay within a comfortable range of motion. Remember, yoga is about finding balance and harmony in your practice, so never push yourself beyond what feels good.
While yoga can provide significant relief for hip pain, it's important to explore other approaches if the pain persists or worsens. Gentle stretching exercises or seeking professional guidance may be necessary in some cases.
The journey towards relief from hip pain may take time, but with consistent practice and patience, you can experience significant improvement in your overall well-being. Make these gentle stretches a part of your regular routine and discover the transformative effects of yoga on your life.
Frequently Asked Questions
What are the benefits of yoga for hip pain relief?
Yoga offers a gentle and effective way to alleviate hip pain by improving flexibility, strengthening muscles, and promoting overall body awareness.
How can yoga help in understanding hip pain and its causes?
Yoga can help individuals understand their hip pain by promoting body awareness and mindfulness, which can aid in identifying the causes of discomfort and addressing them through gentle stretches and strengthening exercises.
What are some gentle yoga stretches for hips?
Some gentle yoga stretches for hips include Warrior II Pose, Triangle Pose, Extended Side Angle Pose, Supine Pigeon Pose, Bridge Pose, and Happy Baby Pose.
What is the importance of consistency in practicing yoga for hip pain relief?
Consistency is key in experiencing the full benefits of yoga for hip pain relief. Regular practice helps in improving flexibility, building strength, and reducing discomfort over time.
How can props enhance the practice of yoga for hip pain relief?
Incorporating equipment such as massage guns and foam rollers can complement yoga practice by aiding in muscle recovery, improving circulation, and releasing tension in the hip area.
Why is it important to prepare for a safe yoga practice?
Proper preparation is crucial for a safe yoga practice as it helps prevent injuries, ensures proper alignment during poses, and allows individuals to fully engage in the practice without discomfort or strain.